
First off if you would like to create a vector concept, you first need a program that handles vectors. For this tutorial I use Inkscape, which is a free program. If you do not already have a vector program, you can download inkscape here: https://inkscape.org/en/download/.
The next thing you will need is a template to do the concepts on. I have a templates page on this blog with a few different vector jersey template options. For this tutorial I am using Steven Grant's template because it is a template that is much easier to use for beginners.
Step 1: Open up the template that you have just downloaded and choose which jersey style you are going to use. In this tutorial I am creating the current home jersey for the Toronto Maple Leafs.
Now you are going to have to ungroup the template so that you can select all the individual parts of the jersey. You can do this by right clicking the selected jersey and choosing ungroup, or the quicker way which is using the shortcut Ctrl+Shift+G.

Step 2: Now we are going to add the logo to the jersey. You can do this at any point during this process but I am doing it right now so that I can select the color of the logo for the jerseys. For the most part you can find almost any sport logo imaginable at a decent size on sportslogos.net, the only problem being that the logos are not vectors.

To solve this problem you have to trace the logo. On the top of the page go to Path> Trace Bitmap. Clicking this will open a window. I first click the colors mode and then change the # of scans to how many colors are in the logo. I also deselect smooth and select remove background. You can preview what the finished product will look like by clicking update, and if you are happy with it click OK.

You may notice that the white of the letters are now gone. To correct this grab the pen tool and fill in around the name without going outside of the leaf. Fill the shape with white and send it behind the leaf. Thats the button with the down arrow going all the way down to a orange rectangle.


Step 3: Now to get the vector logo into the template window you need to copy it and paste it. Select the logo by dragging a box around it with your arrow. Press Ctrl+C to copy it. Then go into the jersey window and press Ctrl+V to paste it.
To make the jersey the same blue color as the logo you first select the white base layer of the jersey, then you select the color dropper on the tool bar on the left, and select the color by clicking wherever the blue is.

Step 4: Now I am going to change the collar from a standard one, to a lace up collar. Choose the lace up collar that comes with the template and drag it over to the jersey. Now you must group the current collar on the jersey by dragging a box around it and pressing Ctrl+G.
The next thing to do is to align the lace up collar to the other collar by using the align and distribute tab on the right. If the tab is not open press Shift+Ctrl+A to do so. With both collars selected, select center and then align on top edges. You can now delete the standard collar and be left with the lace up collar.

Step 5: Just like for the jersey, select the base color of the collar and make it white.

Step 6: We are now going to add the stripes to the jerseys. Grab the rectangle tool and drag across the jersey. You can change the height and width of the stripe either manually by pulling on the arrows around the shape or by inputting the height/width into the boxes on the top bar. I set the height of the stripe to 15 pixels.

Step 7: Duplicate the stripe by pressing Ctrl+D and move it into a position that you find is suitable. Now group the two stripes together(Ctrl+G), and duplicate that to start creating the arm stripes. To rotate the stripes you need to click the button on the top bar that I have highlighted(The triangle on its side).

Step 8: Once you have the first arm stripe in position, duplicate the group and position them in the same position on the other arm. Group together all the stripes by clicking each set while holding shift, then when you have them all selected press Ctrl+G.

Step 9: We are now going to clip the stripes so that they fit perfectly on the jersey. To do this, we have to duplicate(Ctrl+D) the base jersey layer so that it lays on top of the stripes

Select both the top jersey layer and the jersey stripes. With both selected, right click and select set clip.

Voila, you know have a striped jersey. Send the stripes to the bottom(they will disappear) and then bring them forward until they reappear.

Step 10: We are now going to put the stripes on the front of the jersey and transfer them to the back of the jersey. Duplicate the existing stripes, and select the duplicated stripes and the base layer of the back jersey. We are going to align the stripes to the jersey by first centering it and aligning the top edges.

Once again send this layer to the back and bring it forward until it shows up again.

Step 11: This step is a little nitpicky but on an actual jersey the seams end where the stripes begin so we need to get rid of those seams to get the best looking concept possible. Select the tool that is right underneath the arrow tool.

Click the seam so that it is selected. Double click the seam where you want it to end, in this case where the first stripe begins. Note the red square. Click the one square below the one we just created and delete it. Now copy this process with the three other areas that cross the stripes.

Step 12: We are now finished creating the jersey, the only thing left to do is add numbers and the name on the back. Here is a link to download all of the NHL fonts(designed by Conrad, not for commercial use):
http://www.mediafire.com/download/kpid0993nosvyni/Conrads+NHL+Fonts+Pack.zip

Once you have the fonts selected, choose the NHL Toronto Maple Leafs font and start with the numbers. For this jersey I have the numbers at a height of 115 pixels, but basically just use your eyes to best judge if its too big or too small. Next I also type out my name and place it inside the namebar. I believe the height of the letters was 28 pixels. Align both the name and number to the center of the jersey.

Step 13: We are now moving on to the arm numbers. Duplicate the back number and decrease it to an appropriate size, 50 pixels in this case. Since the numbers are so close together, I increase the spacing between the two numbers( The button on the top with the AA). This is so only one number is seen on each sleeve.

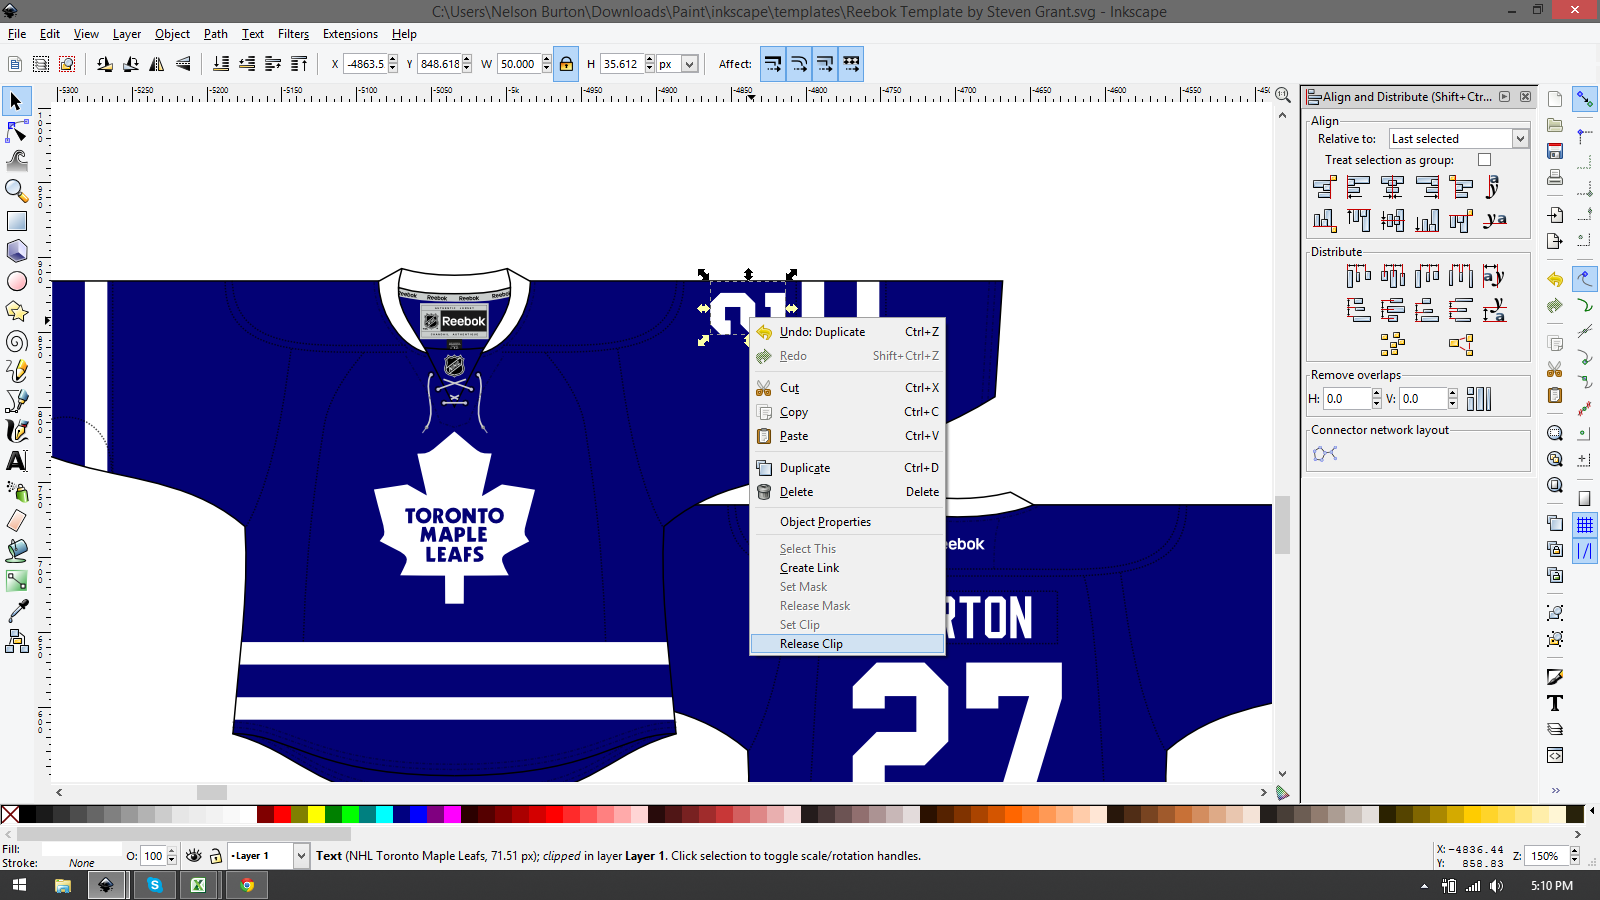
I now rotate the number 90 degrees and move it where I want it to be. The same thing that we did to clip the jersey striping, we are going to do to the number.(See step 9 for how to clip). Once you have the one arm done, duplicate the layer, right click it and release the clip. Delete the blue jersey layer that just popped up and you will now have two copies of the number. You need to release the clip so that you can rotate the numbers and get the 7 on the jersey on the other arm.
Once you have the 7(or whatever number you choose) put on the other arm, group the two arm numbers together. Duplicate the group. Now one set of the numbers to the back side of the jersey( Centre, align to top). Send these numbers to the bottom and bring them forward until you see both.
I usually add a captaincy C to the jersey just for some extra detail but that is up to you. Other than that, this is the final product.

I hope this tutorial helped you figure out how to create concepts and inspires you to get started. If I wasn't clear on one of the steps or you get stuck, just comment below and I will get back to you as soon as I can.
If you feel that inkscape has too steep of a learning curve, there is also a tutorial for creating concepts with paint.net at hockeyjerseyconcepts.
I would also love to see what you came up with once you are done, so feel free to send your concepts to nburtonhd@hotmail.com and I will feature them on the blog.
Thank you very much for the great tutorial! I have a question however. How do I delete the other templates I'm not using? I've tried to use the eraser tool and I've tried ungrouping and using Shift+Mouse to select and delete them. I can't seem to figure it out.
ReplyDeleteI'm glad you found it helpful. Once you have your jersey style selected you should be able to drag a box around the rest of the templates and delete them. I don't usually delete the other templates, I just move my concept over so that the other templates aren't in the way. Hope that helps answer your question.
DeleteIt seems as if the program is treating all of the different templates as one thing, because when I tried to erase a template, it erased the whole entirety of them.
DeleteOh ok I understand what is going on now. All of the jerseys are grouped together when you first open the template so if you click them a box should go around the entire template. When this happens press Ctrl+Shift+G to ungroup the layer. Now you should be able to delete the different jersets
Delete